Shaft Eccentricity plays a very important role
as part of a Turbine Supervisory Instrumentation (TSI) System on large steam turbines and
should be included in retro-fit plans when at all possible. 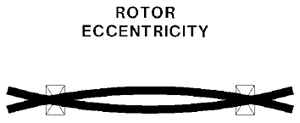
Operators use eccentricity
measurements to determine when a combination of slow roll and heating have reduced the
rotor eccentricity to the point where the turbine can safely be brought up to speed without
damage from excessive vibration or rotor to stator contact.
Eccentricity is the measurement of Rotor Bow at rotor slow roll which may be caused by
any or a combination of the following:
- Fixed mechanical bow
- Temporary thermal bow
- Gravity bow
In extreme cases of thermal/gravity bow, caused by a sudden trip of the unit and
failure of the turning gear to engage, the rotor may be positioned and stopped 180o out of
phase (bow up) to allow gravity to work entirely on the bow and substantially shorten the
time required to reduce the bow.
Eccentricity is measured while the turbine is on slow roll (1 to 240 RPM below the
speed at which the rotor becomes dynamic and rises in the bearing on the oil wedge) and
requires special circuitry to detect the peak- to-peak motion of the shaft. This is
accomplished using circuitry with long update times selectable between 20 seconds (> 3
RPM) and 2 minutes (<3 RPM).
As the eccentricity measurement is not required after a turbine is brought to speed and
under load provisions are made to lock the measurement to zero. This can be accomplished
without external contacts through the use of a speed measurement channel with underspeed
or overspeed alarms.
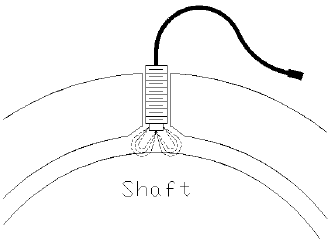
As it is impractical to mount Eddy Probe Transducers (Non-Contacting Pickups) midspan
on the rotor where the eccentricity measurement would be the highest the transducer(s) are
mounted outside the pressure case as far from the bearing (Node Point) as practical.
The bearing should be avoided as a mounting location because during slow roll operation
the rotor is turning in the bottom of the journal bearing and is not dynamic while the
eccentricity measurements are being made. This effect forces the bearings to become nodal
points.
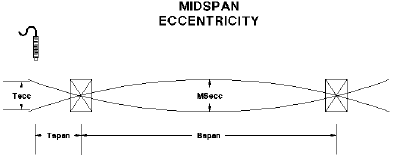
Assuming
uniform stiffness and weight, the rotor mid- span eccentricity may be expressed as the
ratio of the transducer span from the bearing over the transducer measured eccentricity to
1/2 the bearing span over the midspan eccentricity or calculated using the following
formula, (Tecc x Bspan)/Tspan
= MSecc.
Where Tecc = Transducer measured eccentricity
Bspan= Bearing Span
Tspan= Transducer span from bearing
MSecc= Midspan eccentricity
OEM's (Original Equipment Manufacturers) should be consulted for actual calculations.
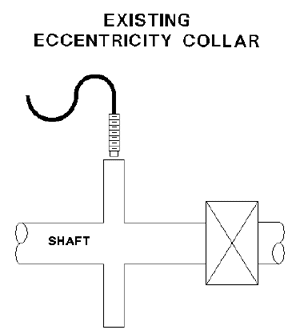
Turbine owners who are retrofitting existing eccentricity systems supplied by
the OEM or others will mount the eccentricity transducer at the same location as the
original installation. In many cases only minor modifications to the existing bracket are
required. Using the same location has several advantages and simplifies installation.
- OEM's original installation as a rule included an eccentricity collar or other good
target for an Eddy Probe System.
- Eddy Probe eccentricity measurements will agree closely with the original OEM supplied
system as the measurements will be taken at the same location.
- Operators will need less training on how to interpret the new systems measurements as
they will be basically the same.
- Eccentricity historical data will be valid.
- Existing brackets may be modified.
- Case or standard penetration for cable may be reused with minor modification.
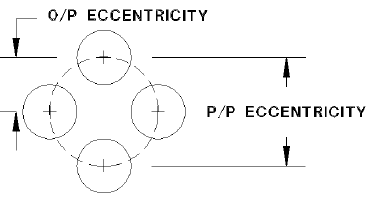
Eccentricity
is normally measured P/P (Peak to Peak) to agree with previously established conventions.
The actual excursion from shaft centerline caused by bow would be one half that
measurement or the 0/P (Zero to Peak) measurement. The Turbine Supervisory Instrumentation
may be calibrated in either fashion to suite the users requirements.
Theory of Operation
Eddy
Current Transducers work on the proximity theory of operation. A system consists of a
matched component system: a Probe, an Extension Cable and an Oscillator /Demodulator
(driver). A high frequency RF signal @2 mHZ is generated by the Oscillator/Demodulator,
sent through the extension cable and radiated from the Probe tip. Eddy currents are
generated in the surface of the shaft. The driver demodulates the signal and provides a
modulated DC Voltage where the DC portion is directly proportional to gap (distance) and
the AC portion is directly proportional to vibration. In this way, an Eddy Current
Transducer can be used for both Radial Vibration and distance measurements such as Thrust
Position and Shaft Position.
Special Considerations
Mounting Orientation
All vibration transducers measure motion in their mounted plane. In other words, motion
either directly away from or towards the mounted Eddy Probe will be measured as
eccentricity.
For eccentricity measurements it is recommended that the transducer be mounted
vertically. As most eccentricity sensors are internally mounted and are not visible from
the outside of the machine whatever the angle of orientation is finally chosen it is very
important that the mounting location be documented for future reference.
Linear Range
Several versions of Eddy Probe Transducers are available with a variety of Linear Ranges
and body styles. In most cases, a sensor with a linear range of 90 mils (0.090") is
more than adequate for Eccentricity measurements.
| Model |
Range |
Output |
Size |
| CMSS65 |
90 mils |
200 mV/mil |
1/4"x28 UNF 1" to 5" Length |
| CMSS68 |
90 mils |
200 mV/mil |
3/8"x24 UNF 1" to 9" Length |
Target Material/Target Area

Eddy
Current transducers are calibrated at the factory for 4140 Steel unless specified
otherwise. As Eddy Probes are sensitive to the permeability and resistivity of the shaft
material, any shaft material other than 4000 series steels must be specified at the time
of order. In cases of exotic shaft material a sample may need to be supplied to the
factory.
Mechanical Runout
Eddy Current transducers are also sensitive to the shaft smoothness for Eccentricity. A
smooth (64 micro-inch) area approximately 3 times the diameter of the probe tip must be
provided for a viewing area.
Electrical Runout
Since Eddy Probes are sensitive to the permeability and resistivity of the target material
and the field of the transducer extends into the surface area of the shaft by
approximately 15 mils (0.015"), care must be taken to avoid non homogeneous viewing
area materials such as Chrome.
Another form of electrical runout can be caused by small magnetic fields such as those
left by Magna-fluxing without proper degaussing.
Perpendicular to shaft centerline
Care must be exercised in all installations to insure that the Eddy Probe is mounted
perpendicular to the shaft center-line. Deviation by more than 1-2 degrees will effect the
output sensitivity of the Probe.
Transducer (Probe) side clearances
The RF Field emitted from the probe tip of the transducer is approximately a 45 conical
shape. Clearance must be provided on all sides of the Probe tip to prevent interference of
the RF Field. Care must also be taken to avoid collars or shoulders on the
shaft that may thermally "grow" out from under the Probe tip as the shaft
expands.
Eddy Probe tip to tip clearances
Although Eddy Probe tip to tip clearances are not normally an issue on most machines, it
should be noted that the probes radiate an RF Field larger than the probe tip itself. As
an example, SKF-CM CMSS65 and 68 Eddy Probes should never be installed with less than one
(1) inch of Probe tip to tip clearance. Larger probes require more clearance. Failure to
follow this rule will allow the driver to create a "beat" frequency which will
be the sum and difference of the two driver RF frequencies.
System Cable Length and Junction Boxes
Eddy Probe Systems are a "tuned" length, and several system lengths are
available. System length is measured from the probe tip to the Oscillator/Demodulator, and
is measured electrically which can be slightly different than the physical length. For
example, the Model 403 is available in 9, 20, and 30 foot system lengths. Care must be
taken to insure that the proper system length is ordered to reach the required Junction
Box.
Grounding and Noise
Electrical noise is a very serious consideration when installing any vibration transducer,
and special care needs to be taken to prevent unnecessary amounts of noise. As most plant
electrical noise is at 60 HZ, and many machine running speeds are also 60 HZ, it is
difficult to separate noise from actual vibration signal. Therefore, noise must be kept to
an absolute minimum.
Instrument Wire
A 3-wire twisted shielded instrument wire (ie; Belden #8770) is used to connect each
Oscillator/Demodulator to the Signal Conditioner Card in the Monitor. Where possible, a
single run of wire from the Oscillator/Demodulator (Junction Box) to the Monitor location
should be used. Splices should be avoided.
The gauge of the selected wire depends on the length of the instrument wire run, and
should be as follows to prevent loss of high frequency signals:
| Up to 200 feet |
22 AWG |
| Up to 1000 feet |
20 AWG |
| Up to 4000 feet |
18 AWG |
The following wiring connection convention should be followed:
| Red: |
-24 VDC Power |
| Black: |
Common |
| White: |
Signal |
Common Point Grounding
To prevent Ground Loops from creating system noise, system common, ground and instrument
wire shield must be connected to ground at one location only. In most cases, the
recommendation is to connect commons, grounds and shields at the Monitor location. This
means that all commons, grounds and shields must be floated (not connected) at the
machine.
Occasionally due to installation methods instrument wire shields are connected to
ground at the machine case and not at the monitor. In this case, all of the instrument
wire shields must be floated (not connected) at the monitor.
Conduit
Dedicated conduit should be provided in all installations for both mechanical and noise
protection. Flexible metal conduit should be used from the Eddy Probe to the Oscillator
/Demodulator junction box, and rigid bonded metal conduit from the junction box to the
monitor.
Calibration
All Eddy Probe systems (Probe, Cable and Oscillator Demodulator) should be calibrated
prior to being installed. This can be done by using a SKF-CM P/N CMSS601 Static
Calibrator, -24 VDC Power Supply and a Digital Volt Meter. The Eddy Probe is installed in
the tester with the target set against the Eddy Probe tip. The spindle micrometer with
target attached is then rotated away from the Eddy Probe in 0.005" or 5 mil
increments. The voltage reading is recorded and graphed at each increment. The SKF-CM
CMSS65 and 68 systems will produce a voltage change of 1.0 VDC 0.05 VDC for each 5 mils
of gap change while the target is within the NCPU's linear range.
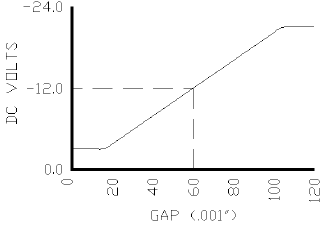
Gap
When installed, Eddy Probes must be gapped properly. In most Eccentricity applications,
gapping the transducer to the center of the linear range is adequate. For the Model 403
transducer gap should be set for -12.0 VDC using a Digital Volt Meter (DVM), this
corresponds to an approximate mechanical gap of 0.060" or 60 mils. The voltage method
of gapping the Eddy Probe is recommended over mechanical gapping because it is more
accurate and easier to accomplish. In all cases, final Eddy Probe gap voltage should be
documented and kept in a safe place.
Eccentricity Installation Checklist
- Machine Slow Roll Speed
- Transducer Orientation Documented
- Target Material, 4140 Other
- Smooth Target Area
- Size of Target Area
- Junction Box Location(s)
- Metal Conduit (Junction Box to Monitor)
- Flexible Conduit (Junction Box to Probe)
- Correct Instrument Wire
- Shielding Convention, Monitor or Machine
- Calibration
- Gap Set
|