Reciprocating
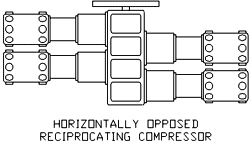
Compressors are utilized in all manufacturing industries. Because these machines
are capable of providing high pressure along with variable loading, they are
favored for many gas process applications. The total quantity of positive
displacement reciprocating engines, pumps and compressors far exceed the number
of centrifugal units.

Past
studies within the Hydrocarbon Processing Industry (HPI) indicate that the
maintenance costs for reciprocating equipment are approximately 3.5 times that
of centrifugal equipment. Substantial savings in maintenance costs and an
increase in run time may be achieved through basic monitoring of some if not all
of the following Reciprocating Machine parameters.
- Frame
Vibration
- Rod
Drop
- Rod
Run-out
- Crosshead
Vibration
- Main
Bearing Vibration
- Valve Temperature
Frame
Vibration
The
most important vibration parameter of a successful monitoring program is Frame
Vibration. When properly applied, monitoring Frame Vibration will help prevent
catastrophic failures. In the event of a failure, the damage to a reciprocating
machine can be reduced.
For
the greatest benefit, a Frame Vibration Monitoring system should be wired to an
automatic machine trip. To decrease the possibility of a false trip, two (2)
case mounted accelerometers should be mounted on the frame relatively close to
each other. The outputs from the two transducers are signal conditioned, and
their trip circuits are "AND" voted. In other words, before a trip is
initiated, both of the transducers with their monitors must sense a high
vibration level.
The CMCP1100 Industrial
Accelerometer is highly recommended for this application. Its low frequency
response of .8 Hz, a standard scale factor output of 100 mV/g, and relative low
cost are desired features for this application. Since this transducer is
Piezoelectric (Solid State Design) based, it is less susceptible to cross axis
signal distortion and wear commonly a problem with other Velocity Transducers.
The two transducers should be perpendicular to the shaft, and oriented in the
direction of the Piston travel. The transducers must be mounted on a surface
that allows direct transmission of the Frame's Vibration.
Avoid mounting the transducers on a cover or door.
The
CMCP1100 Industrial Accelerometer should be interfaced to a CMCP530A Velocity
Monitor. This combination offers numerous advantages over an OEM supplied
EARTHQUAKE Switch.
- Low
Frequency Response
- Solid
State Design (Long Life)
- Indication
of Vibration Levels
- Warning
and Shutdown Alarms
- Shutdown
"AND" Voting
- Fault
Detection
- Vibration
Diagnostic Capability
Monitoring
the Frame Vibration of a Reciprocating Machine offers the following major
benefits:
- Prevent Catastrophic Machine Failures
- Reduction of Machine Damage
Rod
Drop
The
vast majority of Reciprocating Compressors are designed with horizontal
Cylinders and Pistons. This is primarily due to foundation requirements and the
popularity of opposed-balanced machine designs.
The
force of gravity causes the Piston to "RIDE" more in the bottom of the
Cylinder than in the top. In turn, this causes the Piston to wear more in the
"DOWN" direction. Machine manufactures provide wear or rider rings to
provide a replaceable wearing surface. For lubricated Cylinders, glass embedded
Teflon may be used. For non-lubricated Cylinders, Teflon may be used.
The
wear or rider rings are allowed to wear sacrificially. They are rotated or
replaced before damage to the Cylinder lining occurs. There are several methods
used to determine when to replace or rotate the rings. One method is to operate
a new machine for a given number of hours or days. Then a valve is removed, and
the wear is measured by using a feeler gauge. A calculation is then performed
with this information. The results determine the length of time the machine can
be safely operated with periodic inspections of the rings. Obviously, this is a
very frustrating method of performing preventative maintenance.
Currently,
one popular safety device for detecting Rod Drop is a unit mounted under the rod
at a gap determined by the allowable wear of the wear ring. When the rod
contacts the safety unit white metal is worn through allowing instrument air to
escape. This in turn causes a pneumatic flag on the control panel to change
status.
There
are several disadvantages to the above-mentioned methods of Rod Drop detection:
- A
real trend of ring wear cannot be established with a short amount of operating time.
- Since
the machine must be shut down, halting production, periodic
inspections for ring wear are expensive.
- A
change in processed gas, load changes, and foreign matter can
cause an extreme change in ring wear rate.

For
several years, Eddy Probe systems have been utilized to measure Rod Drop. This
method of Rod Drop measurement has been gaining positive recognition with
Reciprocating Machine users. This is especially true on larger machines, or when
the customer has become frustrated with the previously mentioned methods.
To
measure Rod Drop with an Eddy Probe system, the probe is installed in the
vertical direction viewing the rod. The preferred installation would have a
probe bracket adapted to the packing gland plate, mounted internal to the
distance piece. As an alternate solution, some users have used the CMCP801 Eddy
Probe Housing, providing an external adjustment (through the distance piece) of
the probe gap. As the Eddy Current field emitted from the probe tip will
penetrate the rod surface 15 mils, it is important that the observed rod be
homogenous in nature and free of any surface irregularities. The Eddy Probe
system is interfaced to a CMCP545 Position Transmitter to measure the probes DC
output (Probe Gap).
The CMCP545 will provide a 4-20 mA output that is proportional to the DC
Gap Voltage. If a CMCP545A Monitor is used, two levels of alarms with
corresponding Alert and Danger relays are provided. By trending the DC Gap
voltages from the eddy probe, it is possible to measure the average horizontal
running position of the piston rod.
This method of Rod Drop measurement offers advantages over the previously
described methods:
- An
immediate trend of ring wear can be established.
- The
periodic inspections that require a machine shutdown and disassembly are eliminated.
- Wear
rate changes can be observed.
- Both
Warning and Shutdown alarms can be provided.
Monitoring
the Rod Drop of a Reciprocating Machine using an Eddy Probe offers the following
benefits:
- Prevents
Cylinder and Piston damage caused by the Piston
contacting the liner.
- Stops unnecessary periodic inspections that require a machine shutdown
with the associated lost process time.
- Scheduling down time to replace or rotate wear rings within the
limitations of a plant's schedule.
Rod
Run Out
Whereas
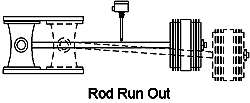
Rod Drop is a measurement of rod position, Rod Run Out is a measurement of the
rod's actual dynamic motion as it travels back and forth on its stroke.
Another term for this measurement is Rod Deflection.
One
method to make this measurement is to mount a dial indicator in the distance
piece riding on the piston rod. The machine is then barred through a complete
cycle. Indicator readings are taken in both the vertical and horizontal
directions during the machine's cycle.
The
amount of Rod Run Out is highly dependent on the cylinder alignment with the
Crosshead. Due to inherent looseness in the Crosshead and thermal growth of the
machine, higher readings of Rod Run Out are allowed in the vertical direction.
The horizontal direction allowances are much less and high readings are
attributed to misalignment. Typical Rod Run Out allowances are 3.5 to 6.0 mils
Pk-Pk in the vertical direction and 1.5 to 2.0 mils Pk-Pk in the horizontal
direction.

An
alternative to dial indicators to make this measurement is again an Eddy Probe
System. Since dial indicators can only be used while the machine is being
barred, they do not provide an accurate measurement of Rod Run Out. On the other
hand, Eddy Probes can make this measurement while the machine is operating. This
provides a highly accurate measurement of the actual dynamic motion of the rod
under full load conditions. Eddy
Probes for Rod Run Out measurement are typically used on "Hyper
Compressors". These are reciprocating compressors used for very high
compression ratios up to 60,000 PSI discharge pressure. To withstand the high
pressures, the gland seals on these machines are quite complex and small amounts
of Rod Run Out will cause these gland seals to fail with severe consequences.
Hyper
Compressor Piston Rods are manufactured of Tungsten Carbide. Tungsten Carbide is
a very hard material (Rockwell C values of approximately 84): will handle
enormous compressive loads, but is much weaker when subjected to tension of
flexing. Either a gland seal or Piston Rod failure in a Hyper Compressor will
have harsh consequences.
Utilizing
the AC component (dynamic motion) of an Eddy Probe signal, one eddy probe is
mounted in the vertical (x) axis and one is mounted in the horizontal (Y) axis
in relation to the Piston Rod. Each Eddy Probe is interfaced to a CMCP540A
Vibration (Displacement) Monitor for signal conditioning, alarming and interface
to a PLC or DCS.
The
vertical Eddy Probe can also be used as for Rod Drop measurements. Therefore,
the installation of X and Y Eddy Probes can be used for both Rod Run Out and Rod
Drop measurements.
This
method of Rod Run Out measurement offers advantages over the dial indicator
method:
- The measurement is taken all the time.
- The measurement is taken while the machine is operating under load and at
temperature.
- Alarms are provided for early indication of problems and machine shutdown
if desired.
Monitoring
the Rod Run Out of a Reciprocating Machine using X, Y Eddy Probes offers the
following benefits:
- An assurance that Rod Run Out is within tolerable limits after the
machine is at operating speed and temperature.
- An early warning of gland seal failure caused by excessive Rod Run Out.
- Machine shutdowns for repairs can be scheduled
- To reduce effects on plant production.

Crosshead
Vibration
The
Crosshead of a Reciprocating Machine is made up of several major components:
Crosshead Bed, Crosshead, Slippers and Crosshead Pin. The purpose of the
Crosshead is to transform the circular motion of the crankshaft into linear
motion for the rod and piston.
The
Crosshead slides on a lubricated babbitted surface much like a standard journal
bearing. However, the Crosshead slides back and forth instead of in a circular
motion like a shaft. Clearance between the Crosshead and the babbitt surface may
be in the range of 10 to 25 mils. As crankshaft rotates, the Crosshead is driven
to slide on either the upper or lower babbitt surface. As the clearance between
the Crosshead and babbitt surface increases, the Crosshead vibration increases.
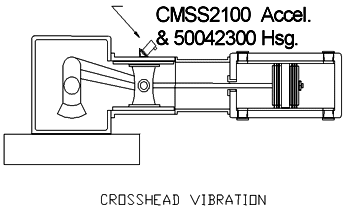
In a compromise to measuring both vertical and in-line with the cylinder,
experience has shown that a CMCP1100 Industrial Accelerometer, mounted on a 45°
angle block, located in-line with the piston travel, will adequately measure
Cross Head vibration.
The CMCP1100 Accelerometer would be connected to a CMCP530(A) Velocity
Transmitter (Monitor).
By
processing the vibration signal in Peak Acceleration instead of RMS detection,
we can measure high amplitude short duration peals or events that
appear periodically. The Cross Head mounting location in-line with Piston travel
will see the mechanical transfer of energy caused by impacts resulting from
mechanical looseness on the compressor cylinders, such as loose rod nuts and
loose bolts. Liquid in the process can also be detected. Competitive offerings
may refer to this measurement as Rod Impact monitoring.
Crosshead
Pin lubrication can also be diagnosed with this measurement. The Crosshead Pin
connects the connecting rod from the crankshaft to the crosshead. This pin is
force lubricated through "reversal" which allows oil between the pin
and its bushing. With each stroke, the oil is forced out. If reversal does not
occur, the pin and its bushing will fail rapidly.
Monitoring
the Crosshead Vibration with an Accelerometer offers the following benefits:
- Assures
that the Crosshead to babbitt surface clearance is within acceptable limits.
- By analyzing the vibration waveform, Crosshead Pin reversal can be
confirmed.
- Machine shutdowns for repair can be scheduled.
Main
Bearing Vibration
Main
Bearing Vibration has not been proven to be a popular approach for monitoring
Reciprocating Compressors. Several end users have had problems with broken
crankshafts, which they thought were caused by unusual bending of the
crankshaft. In one documented case, machinists had over tightened the drive
belts powering the cooling fan on a reciprocating engine. This caused
unnecessary bending of the crankshaft.
Currently,
several end users have installed X and Y Eddy Probe systems on the main
bearings of large 12,000 HP Reciprocating Compressors. This installation very
nearly resembles that of a standard centrifugal compressor. However, both probes
view the crankshaft from the bottom bearing cap-mounted 90° apart. As
the lubricating oil cools the main bearing, no unusual measures needed to be
taken on this installation.

The Eddy Probes are connected
to a CMCP540 Vibration (Displacement) Monitor to measure radial
vibration. The full-scale range of the monitor is based on the bearing
clearance. As in all Reciprocating Compressor applications, the
entire bearing
clearances are used.
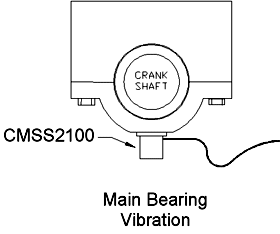
A cost effective compromise
in lieu of installing X, Y Eddy Probes is to mount a CMCP1100 Industrial
Accelerometer in-line with the crankshaft centerline and interface it with a
CMCP530(A) Velocity Transmitter (Monitor).
Valve
Temperature
According
to industry studies, valve failures account for 41% of the problems associated
with reciprocating machinery.
In
a Reciprocating Compressor, the valves are a pressure actuated "Poppet"
variety. Every machine manufacturer has favorite types of valves for different
applications. These valves operate utilizing a delta or differential pressure
technique. The opening and closing of a valve occurs when the delta pressure is
less than the force of their return springs.
When
a valve begins to fail, it usually begins to leak the process gas. This causes
the process gas to be re-compressed, further heating the gas. This higher
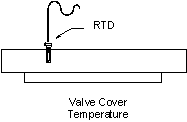
temperature process gas can be detected using a temperature transducer. This
transducer can be mounted through the valve cover plate measuring the gas
temperature near the valve. In some installations, the transducer is simply
imbedded in the valve cover plate, or within a valve cover plate bolt. This
mounting method is preferred when the process gas is explosive, which is usually
the case.

The
measured temperature of the process gas is then compared to the measured
temperature of the process gas at the same type valve, suction or discharge, and
the same stage of compression. Measured temperature differences of 4 to 20° F can indicate a problem with a valve.
Monitoring
the temperature of the process gas at each valve offers the following benefits
to the customer:
-
Provides
an early indication of a problem with a valve reducing the possibility of
machine damage.
-
If
a problem with a valve occurs, only the bad valve needs replacement increasing
machine run time. This approach does not limit the life of all the valves to the
shortest life of a valve.
-
Trending the valves' conditions can allow for scheduled machine
shutdowns.
-
Help prevent damage to the cylinder lining that occurs when valve parts
are ingested by the machine.
-
Each RTD is connected to a
CMCP560(A) RTD Temperature
Transmitter (Monitor).
Checklist
- Target Material (Rod Drop & Run Out)
- Rod Drop Full Scale Range
- Machine Speed/Low Frequency Transducers
- Transducers Mechanically Protected
- Flexible Conduit (J-Box to Transducer)
- IMC Conduit (J-Box to Monitor)
- Correct Instrument Wire
- Instrument Wire Shielding Conventions
- Calibration
- Eddy Probe Gap Set
- CMCP500 Series Monitors
|


