|
|
|
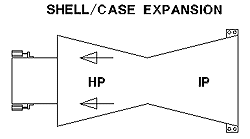
Turbine Supervisory Instrumentation: Shell or Case Expansion Last Updated: 12/30/2011 |
|||||||||||||||||||||||||||
Turbine Supervisory Instrumentation:
|
|||||||||||||||||||||||||||
Shell or Case Expansion is a very important
measurement as part of a Turbine Supervisory Instrumentation (TSI) System for large steam
turbines. This measurement should be included in turbine retrofit plans when at all
possible.
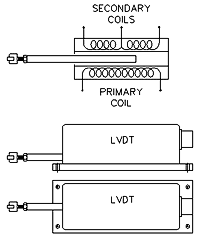
Used in conjunction with a Differential Expansion (DE) measurement (Case to Rotor) the thermal growth of both the case and rotor can be monitored to prevent costly rubs between the rotating and stationary parts of the turbine. The recommended Shell Expansion measurement device is a CMCP LVDT (Linear Variable Differential Transformer) engineered and manufactured to provide long measurement ranges, long life and simple installation. Both retrofit and new applications may be accommodated easily with CMCP LVDT design as it incorporates a protective epoxy coated aluminum housing with mounting flanges and a spring loaded plunger with an adjustable roller tip. Occasionally due to improper turbine shell pre-heating, maintenance or the location of the steam inlets being used to preheat the turbine the turbine shell may become distorted which can cause internal damage.
Theory of Operation Special Considerations
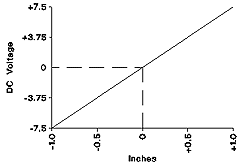
Operating RangeThe standard CMCP LVDT has a standard operating range of 1.0, 2.0 or 4.0 inches. The most common used is 0-2 inches (0-50 mm) with an output of (-7.5)-0-(+7.5) VDC and an accuracy of ±0.5 % full scale. A shorter range may be selected by using the center portion of the LVDT standard operating range. Longer ranges are available on request. Transducer InstallationThe body of the LVDT is designed to be rigidly attached to the turbine foundation and the spring loaded roller tipped plunger is to press against a bracket that is attached to the Front Standard or Turbine Case.
 The bracket must be designed not to interfere with turbine operation and allow the roller tip of the plunger to ride against freely it throughout the entire range. Measurement ConventionThe CMCP LVDT operates on the standard instrument convention that as the plunger or rod is compressed into the LVDT body (motion towards the transducer) the signal output increases or goes more positive. The LVDT may be installed in either direction so that thermal growth causes a more positive going signal or a negative going signal. The monitoring system can be configured for either direction. ConduitDedicated TSI System conduit should be provided in all installations for mechanical protection of the instrument cable. Rigid IMC conduit is required from the monitor location to the LVDT location. The final 2-3 feet of the conduit installation should be completed with flexible conduit to facilitate transducer removal. The CMCP LVDT body is equipped with a 3/4" NPT conduit fitting. Instrument WireFor LVDT applications a 4-conductor, twisted, shielded, insulated, instrument wire should be utilized between the monitor location and the LVDT. This wire should be a continuous run and not be spliced. Alternately two (2) individual twisted, shielded pair wires may be used with extreme care taken to properly tag the cables to prevent improper connection. The following wiring connection convention should be followed:
The following Belden Part# have been provided for your convenience. They may be cross referenced to other wire manufactures.
Calibration
|
||||||||||||||||||||||||||
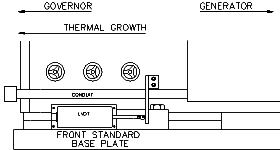
 The Shell Expansion measurement is utilized by operators to monitor the proper
thermal growth of the turbine's shell during startup, operation, and
shutdown. The turbine's shell is anchored to the foundation at one end of the machine and
allowed to expand or grow by sliding towards the opposite end. The expansion or growth of
the turbine's shell Shell Expansion is the measurement of how much the turbine's shell
expands or grows as it is heated. As large turbine cases grow or expand thermally, in some
case up to several inches, and was usually supplied as part of the Original Equipment
Manufactures TSI system supplied with the turbine.
The Shell Expansion measurement is utilized by operators to monitor the proper
thermal growth of the turbine's shell during startup, operation, and
shutdown. The turbine's shell is anchored to the foundation at one end of the machine and
allowed to expand or grow by sliding towards the opposite end. The expansion or growth of
the turbine's shell Shell Expansion is the measurement of how much the turbine's shell
expands or grows as it is heated. As large turbine cases grow or expand thermally, in some
case up to several inches, and was usually supplied as part of the Original Equipment
Manufactures TSI system supplied with the turbine.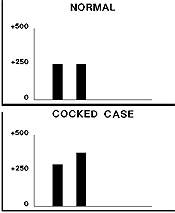 Turbine "Cocking" occurs when the turbine slider hangs up or sticks on one side of the foundation and continues to grow or slide on
the other. This condition sometimes corrects itself by breaking loose quite
dramatically. To monitor for distortion or cocking two (2) LVDT's may be utilized and are installed on either side of the Front Standard or turbine case. If the Turbine Case does
not grow evenly the case is allowed to cool and then reheated with more even heat
distribution.
Turbine "Cocking" occurs when the turbine slider hangs up or sticks on one side of the foundation and continues to grow or slide on
the other. This condition sometimes corrects itself by breaking loose quite
dramatically. To monitor for distortion or cocking two (2) LVDT's may be utilized and are installed on either side of the Front Standard or turbine case. If the Turbine Case does
not grow evenly the case is allowed to cool and then reheated with more even heat
distribution.