Courtesy of STI Vibration
Monitoring Inc.
www.stiweb.com
Misalignment can be the most usual cause for
unacceptable operation and high vibration levels. New facilities or new equipment
installations are often plagued by improper alignment conditions.
Many methods are used
to align machinery. The simplest method is using a straight edge to bring the machines
into rough alignment. A rough alignment is necessary due to the range limitations of the
dial indicators. A popular method used for years and is still in use today is the rim and
face method. This method produces acceptable results, but is less accurate than the
reverse dial indicator method covered in this application note. Additionally, reverse dial
alignment does not require removal of the coupling to collect data.
Working with Dial Indicators
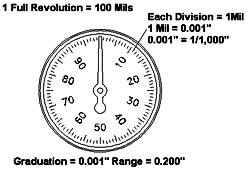 Dial indicators are available in many physical sizes and ranges. For
most alignment applications the smaller sized indicators should be used to reduce
indicator bar sag. Dial indicators should be chosen that have a range of 0.100 inch and
accurate to 0.001 inch. Dial indicators are available in many physical sizes and ranges. For
most alignment applications the smaller sized indicators should be used to reduce
indicator bar sag. Dial indicators should be chosen that have a range of 0.100 inch and
accurate to 0.001 inch.
Indicator
readings, and many other types of readings, are expressed in several units. A reading of
1/1000" is equivalent to 0.001 inch and is commonly expressed as 1 mil.
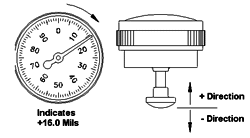 A common convention used when reading dial indicators is that when the indicator
plunger is moved toward the indicator face the display shows a positive (+) movement of
the dial needle by sweeping the needle clockwise. As the plunger is stroked away from the
face a negative (-) reading is displayed by sweeping the needle counterclockwise. Negative
movements of the dial needle may be confusing if the indicator is not observed carefully
throughout the rotation cycle of the machine shafts. A common convention used when reading dial indicators is that when the indicator
plunger is moved toward the indicator face the display shows a positive (+) movement of
the dial needle by sweeping the needle clockwise. As the plunger is stroked away from the
face a negative (-) reading is displayed by sweeping the needle counterclockwise. Negative
movements of the dial needle may be confusing if the indicator is not observed carefully
throughout the rotation cycle of the machine shafts.
Another convention to employ is that when all readings are recorded, they should be
interpreted recorded by viewing from the stationary machine to the moveable machine. This
convention is necessary to distinguish right from left readings during data collection
process and will be applied when the calculations and graphs are made to decide upon the
actual moves required at the moveable machine.
Pre-Alignment Conditions
Prior to any alignment activity an extensive list of items must be checked to ensure
acceptable results. The obvious item involves ensuring that the machine shaft axes are
roughly aligned within 50 mils. Other inspections should include:
- The foundation base plate is adequate and that grout has been installed properly.
- All machine feet are in full contact with the foundation baseplate or supports.
- Piping is not inducing strain onto the machine cases. Piping should be aligned to within
" of their flanges.
- The machine feet bolt holes have enough clearance to conduct alignment activity.
- The coupling faces are axially aligned; the axial spacing between the coupling faces as
correct.
- Coupling radial runout is less than 2 mils.
- Coupling face runout is less than ½ mil.
- The moveable machine has as initial shim pack installed; the shim pack should be
comprised of one thick spacer and one or two smaller shims. Too many shims will act like a
spring causing additional problems.
- The required amount of cold offset compensation is available; this may be available from
the machine manufacturer.
- The alignment bracketry is appropriate to the activity required.
MOUNTING DIAL INDICATORS
Many commercially available reverse dial indicator alignment kits have modular bracketry
which can encompass the majority of applications. However, some applications will require
a custom bracket. Regardless of the type of bracket used, the amount of bracket or bar sag
should be documented so that this information is available to be included in the
calculations.
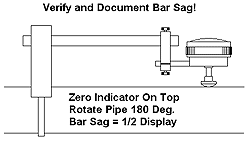 Bar sag can be easily documented by installing the bracket and dial indicator, in the
identical arrangement to be used on the machine,
onto a pipe. Zero the indicator while it is on top of the pipe. Now rotate the pipe 180 so
that the indicator is at the bottom position. The indicator will now display twice the
amount of bar sag. Bar sag can be easily documented by installing the bracket and dial indicator, in the
identical arrangement to be used on the machine,
onto a pipe. Zero the indicator while it is on top of the pipe. Now rotate the pipe 180 so
that the indicator is at the bottom position. The indicator will now display twice the
amount of bar sag.
Mounting the indicator onto the bracketry should be performed carefully so that the
indicator plunger axis is perpendicular to the machine shaft axis to ensure accurate
readings. An error of only 10 will produce a 16% error in the indicator reading.
Taking Readings
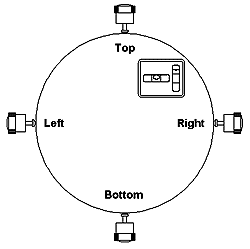 After the bracketry is firmly attached and the dial indicators are installed, four reading
locations are required. These locations are along
the circumference of the shaft or coupling in the path of the indicator plunger. They are
top, bottom, right, and left. These location are to be separated by 90 of shaft rotation.
Marking these locations with an indelible marking pen is adequate. Another approach is to
use a common two axis trailer level attached to a coupling face or other surface to
determine when the shaft has been rotated 90 . Placing four pieces of tape equally spaced
around the circumference of the shaft will work, as long as the tape is not in the path of
the indicator plunger. After the bracketry is firmly attached and the dial indicators are installed, four reading
locations are required. These locations are along
the circumference of the shaft or coupling in the path of the indicator plunger. They are
top, bottom, right, and left. These location are to be separated by 90 of shaft rotation.
Marking these locations with an indelible marking pen is adequate. Another approach is to
use a common two axis trailer level attached to a coupling face or other surface to
determine when the shaft has been rotated 90 . Placing four pieces of tape equally spaced
around the circumference of the shaft will work, as long as the tape is not in the path of
the indicator plunger.
Before any readings can be taken the dial indicators must be set. A simple test of
rotating the machine shaft through an entire 360 sweep will verify that the indicator
plunger tip is in complete contact with the shaft. When the indicator is at the top
location the indicator should be reset to display zero. This is accomplished by rotating
the outer bezel of the indicator until the dial face, which is attached to the bezel,
shows "0" under the needle.
Collecting the data is simply a matter of rotating the machine shaft in 90 increments
and noting the dial indicator readings with their signs (+ or -).
If only one dial indicator setup is available, the bracketry must be relocated to the
other coupling or shaft and the sweep should be repeated. Remember, that all readings
should be collected while observing from the stationary machine to the moveable machine to
maintain right and left consistency.
Accuracy Verification
Collecting the necessary data is simple enough, but will be entirely useless without some
form of accuracy verification. Each time the dial indicator is rotated to the top location
it should display a reading of zero. If it does not then something has moved during the
rotation: indicator, bracket, clamping mechanism, machine. Correct the problem and start
over.
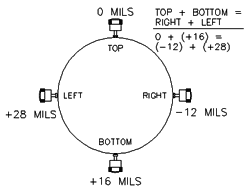 Another test, which can be performed as the data is
collected, is to verify that the sum of the top and the bottom readings should equal the
sum of the left and right readings. Another test, which can be performed as the data is
collected, is to verify that the sum of the top and the bottom readings should equal the
sum of the left and right readings.
Calculations
As the dial indicator is swept around the circumference of a coupling or shaft it displays
twice the difference between the projected centerline of the indicator's attachment point
and the measured shaft centerline. This argument applies for both the vertical and
horizontal readings.
Thus, the sum of the vertical and horizontal readings must be divided by two to
represent the actual differences in the two shaft centerlines. Remember to observe the
signs of the indicator readings closely to prevent errors in these calculations.
Two vertical offset numbers and two horizontal offset numbers will be obtained; one set
representing the readings while the bracketry is installed on the original shaft and
another set representing the readings while the bracketry is installed on the second
shaft.
Horizontal calculations sometimes present some confusion because one side does not
start at zero. Adding or subtracting the magnitude of the right side reading to both sides
will force the right side to zero.
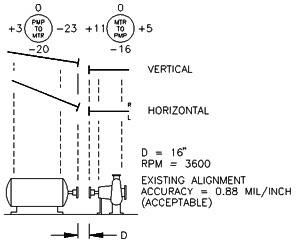 Graphing the Results Graphing the Results
Presenting the calculated results in a graphical format will assist in visualizing the
required machine moves. Although any size graph scale is adequate for this process,
expanding the scale as large as possible will improve the accuracy of the move
calculations because the measured differences of the shaft or coupling centerlines are
projected out to the locations of the moveable machine's feet.
As the figure shows, two sets of dial indicator readings are collected. The readings
taken on the stationary coupling are located above the stationary machine (pump) and the
readings collected on the moveable coupling are located above the moveable machine
(motor). When plotting these readings start with the stationary readings and then proceed
to plot the moveable readings.
Directly plotting the measured readings will display a representation of the existing
mis-alignment. The desired alignment condition can be drawn onto the graph. The desired
condition should include any offset compensation so that when the machine train is
operating under normal conditions the alignment is within acceptable tolerances.
Choose a graph scale
large enough to provide sufficient accuracy when all calculations are completed. Lay out
the physical dimensions of the machine train and show the collected data on the graph for
completeness.
On the graph show the
locations of the machine feet, the dial indicator sweep plane, and the location of the
power transmission points. Note that for this example, the power transmission points do
not coincide with the sweep path of the dial indicators.
When actually plotting the vertical offsets, start with the
stationary set first. Remember that the data collected represents twice the actual
differences between the shaft centerlines. A positive result is plotted above the line
representing the stationary machine centerline. When plotting the moveable machine
readings a rule of thumb is that opposite signs are plotted on the same side of the
stationary machine centerline on the graph.
For simplicity's sake, the horizontal readings are plotted separately in this example.
A better approach is to combine the vertical and horizontal plots onto a single plot.
Just as was performed for the vertical plots, the horizontal plot
has a scale reference, the field collected data, and other important dimensions shown for
completeness. Also, note that the stationary machine centerline is labeled right and left.
The same process of plotting the data is followed, but note that
the field collected data has been adjusted so that the right side readings have a
magnitude of zero to make plotting easier. The opposite sign rule of thumb also applies
for horizontal plotting.
After all the data has been plotted, the required corrections of the moveable machine
can be obtained directly from the graph. Obtaining this information in this manner
eliminates mathematical errors possible using other methods. Graphical presentations allow
experimentation and study of many possibilities for correcting alignment.
For this example, the motor outboard feet need to be lowered 17
mils and the inboard feet must be lowered 12.5 mils for a perfect alignment with the pump.
This alignment condition assumes that the pump does not thermally grow as it operates.
If some thermal growth is anticipated, then this information can be plotted on the graph
as an offset of the stationary machine's centerline and appropriate moves of the moveable
machine can be obtained by projecting the stationary machine's centerline over to the
moveable machine's location.
The horizontal movements for this example are 35.5 mils to the left at the motor
outboard and 16.5 mils to the left at the inboard motor feet.
Graphically plotting the results makes the movement computations easier, but prior to
any moves the following topic "ACCEPTANCE TOLERANCE" should be considered
because the existing alignment may be acceptable. Re-alignment of a machine with
acceptable alignment conditions is a waste of time and is only a practice exercise at best
that may produce a worse alignment condition.
ACCEPTANCE TOLERANCE
Determining whether the existing alignment condition is acceptable or the actual machine
moves resulted in an acceptable alignment condition can be quantified by referencing the chart at the end of this
application note. This chart may be applied to all machine and coupling types. The chart
takes into account the coupling span and the machine operating speed.
The key to applying the chart is to determine the locations at which the power is
transmitted. For gear type couplings the power transmission points are the gear teeth on
each coupling half. For diaphragm type couplings the power transmission points are the
coupling faces.
The locations of the power transmission points should be noted on the graphical plot.
Depending upon the data collection method and the coupling type,. the power transmission
points may not coincide with the coupling faces or the dial indicator sweep path.
Following are the calculations necessary to determine the alignment accuracy:
Alignment Accuracy = Maximum (X, Y)/D
where
X = ( XV2 + XH2 )½
Y = (YV2 + YH2 )½
XV and XH = amount of offset, vertically and horizontally, at the power transmission
point on the stationary machine.
YV and YH = amount of offset, vertically and horizontally, at the power transmission
point on the moveable machine.
Maximum (X, Y) = larger of X or Y, calculated above.
Plotting the resultant alignment accuracy on the chart will determine whether the
existing alignment condition is acceptable or whether the proposed correction moves will
produce acceptable results.
MOVING THE MACHINE
Moving a machine is, in many cases, difficult due to their size and weight. Extremely
heavy machines, such as power plant generators will require hydraulic jacks. Most other
machines can be moved using jacking screws, which are rigidly attached to the foundation
base plate, and pry bars to lift the machine.
Prior to any horizontal move a dial indicator should be installed to monitor each foot
along one side of the machine for horizontal movements. Vertical movements will require an
indicator on each foot on both sides of the machine. Vertically oriented indicators should
be observed as the machine foot bolts are re-torqued. The displayed indication should not
change by more than 1-2 mils, indicating that all feet are supporting the machine equally.
Finally, after the bolts are re-torqued the jacking bolts should be backed out so that
they do not influence the natural thermal growth as the machine heats. Other machines,
such as gear boxes, turbines, and compressors should have dowel pins installed at
strategic locations to control the thermal growth direction.
The best choice for shim material is stainless steel. This material is very stable and
is easy to maintain. Carbon steels should be avoided because it will rust and eventually
compromise the machinery alignment. Synthetic or plastic shim material should be avoided
for industrial applications because it is easily damaged and under heavy load will deform
which compromises the alignment condition.
The shims used for industrial applications should be large enough to adequately support
each foot. Commercial shims are available in various dimensions. These shims are precut
and dimensioned to standard thicknesses which are labeled on a small tab. These shims are
easy to install and are difficult to mix up. If shims are manufactured in the field they
should be large enough to support the machine foot and all edges should be smoothed to
eliminate burrs. Kinked or otherwise damaged shims should be discarded and new ones
obtained. The shims, the base plate surface, and bottoms of the machine feet should be
clean and free of defects prior to installing any shims.
WHICH MACHINE MOVES?
Generally, the stationary machine has certain constraints which make in impractical to
move it. Pumps have rigid piping attached, generators have complex cooling systems, and
gear boxes are relatively sensitive to any orientation other that flat and level. When
these machine types are moved the attached systems must be relocated to eliminate sources
of strain.
Multiple case machine trains, such as dual compressors driven by one turbine, pose
another problem. All three machine shafts must operate co-linearly to function
efficiently. By studying the graphical plot of the current alignment and the desired
alignment it may prove most effective to move the center machine case, instead of moving
two or three machines.
Alignment Checklist
- Pre-alignment Conditions
- Shim Materials
- Indicator Bracket Sag
- Graph Materials
|