Accelerometer Transducers and Installation
Accelerometers have been a popular choice for
rotating machinery vibration monitoring. They are a rugged, compact, light weight
transducer with a wide frequency response range. Accelerometers have been used extensively
in many machinery monitoring applications. This transducer is typically attached to the
outer surface of machinery. Generally this machinery will have parts that generate high
frequency signals, such as, rolling element bearings or gear sets.
The application and
installation of an accelerometer must be carefully considered for an accurate and reliable
measurement.
Accelerometers were designed to be mounted on machine cases. This will provide
continuous or periodic sensing of absolute case motion (vibration relative to free space)
in terms of acceleration.
Theory of Operation
 Accelerometers are inertial measurement devices that
convert mechanical motion to an electrical signal. This signal is
proportional to the vibration's acceleration using the piezoelectric
principle. Inertial measurement devices measure motion relative to a mass.
This follows Newton's Third Law of Motion: A body acting on another will
result in an equal action on the first. Accelerometers are inertial measurement devices that
convert mechanical motion to an electrical signal. This signal is
proportional to the vibration's acceleration using the piezoelectric
principle. Inertial measurement devices measure motion relative to a mass.
This follows Newton's Third Law of Motion: A body acting on another will
result in an equal action on the first.
Accelerometers consist of a piezoelectric crystal and mass normally enclosed in a
protective metal case. As the mass applies force to the crystal, the crystal creates a
charge proportional to acceleration. The charge output is measured in pico Coulombs per g
(pC/g) terms where g is the force of gravity. Some sensors have an internal charge
amplifier, while others have an external charge amplifier. The charge amplifier converts
the charge output of the crystal to a proportional voltage output in mV/g terms.
Current or Voltage Mode
This type of accelerometer has an internal, low-output impedance amplifier and requires an
external power source. The external power source can be either a constant current source
or a regulated voltage source. This accelerometer is normally a two wire transducer with
one wire for power and signal, and the second wire for common. This type of Accelerometers
have a lower temperature rating due to the internal amplifier circuitry. Signal cable
lengths up to 500 feet have negligible effect on the output signal quality. Longer cable
lengths will reduce the effective frequency response range.
Charge Mode
Charge mode accelerometers differ slightly from current or voltage mode types. This sensor
has no internal amplifier and therefore have a higher temperature rating. An external
charge amplifier is supplied with a special adapter cable which is matched to the
accelerometer. Field wiring is terminated to the external charge amplifier. As with
current or voltage mode accelerometers, signal cable lengths up to 500 feet have
negligible effect on the output signal quality. Longer cable lengths will reduce the
effective frequency response range.
Special Considerations
Mounting
There are three mounting methods typically used for monitoring applications: bolt
mounting, glue, and magnets.
The bolt mounting method is the best method available for permanent mounting
applications. this method is accomplished via a stud or a machined block. This method
permits the transducer to measure vibration according to the manufacturer's
specifications. The mounting location for the accelerometer should be clean and paint
free. The mounting surface should be spot-faced to a surface smoothness of 32
micro-inches. The spot-faced diameter should be 10% larger than the accelerometer
diameter. Any irregularities in the mounting surface preparation will translate into
improper measurements or damage to the accelerometer.
The adhesive or glue mounting method provides a secure attachment without extensive
machining. However, this mounting method will typically reduce the operational frequency
response range. This reduction is due to the damping qualities of the adhesive. Also,
replacement or removal of the accelerometer is more difficult than any other attachment
method. Surface cleanliness is of prime importance for proper adhesive bonding.
The magnetic mounting method is typically used for temporary measurements with a
portable data collector or analyzer. This method is not recommended for permanent
monitoring. The transducer may be inadvertently moved and the multiple surfaces and
materials of the magnet may interfere with or increase high frequency signals.
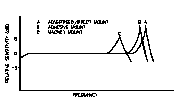
 As can be seen in the figure to the left, the mounting
method also has an effect on the operating frequency range of an accelerometer. By design, accelerometers
have a natural resonance which is 3 to 5 times higher than
the advertised high end frequency response. The frequency response range is
limited so that a flat response is provided over the operating range. The
advertised range is achievable only by bolt mounting. Any other mounting
method will adversely affect the natural resonance, and in turn the usable
frequency response range. As can be seen in the figure to the left, the mounting
method also has an effect on the operating frequency range of an accelerometer. By design, accelerometers
have a natural resonance which is 3 to 5 times higher than
the advertised high end frequency response. The frequency response range is
limited so that a flat response is provided over the operating range. The
advertised range is achievable only by bolt mounting. Any other mounting
method will adversely affect the natural resonance, and in turn the usable
frequency response range.
Sensitivity
Accelerometers utilized for vibration monitoring are usually designed with a sensitivity
of 100 mv/g. Accelerometers can be supplied with a wide range of sensitivities for special
applications such as structural analysis, geophysical measurement, or very high frequency
analysis.
Frequency Range
Accelerometers are designed to measure vibration over a given frequency range. Once the
particular frequencies of interest for a machine are known, an accelerometer may be
selected. Typically, an accelerometer for measuring machine vibration will have a
frequency range from 1 or 2 hertz to 8 or 10k hertz.
An accelerometer is used on machines when high frequency measurements are desired. In
terms of energy sensed by the transducer, acceleration will have larger amplitudes as the
frequency increases. At low frequencies, the acceleration amplitudes may be quite small
giving a false impression of an acceptably operating machine.
Calibration
Piezoelectric accelerometers can not be recalibrated or adjusted. Unlike a velocity
pickup, this transducer has no moving parts subject to normal wear. Therefore, the output
sensitivity does not require periodic adjustments to correct for wear.
An accelerometers has internal components which can be damaged from shock or
overheating. When an accelerometer is suspect, a simple test of the transducer's bias
voltage will help determine whether it should be removed from service. An accelerometer's
bias voltage is the DC component of the transducer's output signal. The bias voltage is
measured with a DC volt meter across the transducer's signal output and common leads with
power applied. At the same time, the power supply voltage should also be checked to
eliminate the possibility of improper power voltage affecting the bias voltage level.
Instrument Wire
The following table is a partial list of Belden Cables that should be used for the
instrument field wiring. These part numbers may be cross referenced to equivalent cables
from other manufacturers. The listed cables are polyethylene insulated, twisted, with
Beldfoil shield, drain wire, and PVC jacket.
| Belden Part Numbers |
|
P/N |
Nom. O.D. |
| 18 AWG |
8760 |
0.22" |
| 20 AWG |
8762 |
0.20" |
| 22 AWG |
8761 |
0.18" |
Common Point Grounding
To prevent Ground Loops from creating system noise, system common, ground and instrument
wire shield must be connected to ground at one location only. In most cases, the
recommendation is to connect commons, grounds and shields at the Monitor location. This
means that all commons, grounds, and shields must be floated or not connected at the
machine.
Occasionally, due to installation methods, instrument wire shields are connected to
ground at the machine case and not at the monitor. In this case, all of the instrument
wire shields must be floated or not connected at the monitor.
Conduit
Dedicated rigid conduit should be provided in all installations for mechanical and noise
protection. The conduit should be metal, and in direct contact with each segment. All
metal junction boxes and fittings should be in direct contact with the conduit. With this
type of installation, a single ground point can be established.
To facilitate removal of the accelerometer, a junction box with a barrier terminal
strip should be located close to the transducer. The rigid conduit should be attached to
the junction box, and the final run to the transducer can be metal flexible conduit.
Accelerometer Checklist
- Accelerometer Type, Current or Voltage Charge
- Sensitivity Frequency Range
- Calibration
- Correct Instrument Wire Grounding
- Rigid Conduit Location(s) Documented
|

 Accelerometers are inertial measurement devices that
convert mechanical motion to an electrical signal. This signal is
proportional to the vibration's acceleration using the piezoelectric
principle. Inertial measurement devices measure motion relative to a mass.
This follows Newton's Third Law of Motion: A body acting on another will
result in an equal action on the first.
  As can be seen in the figure to the left, the mounting
method also has an effect on the operating frequency range of an accelerometer. By design, accelerometers
have a natural resonance which is 3 to 5 times higher than
the advertised high end frequency response. The frequency response range is
limited so that a flat response is provided over the operating range. The
advertised range is achievable only by bolt mounting. Any other mounting
method will adversely affect the natural resonance, and in turn the usable
frequency response range.