Comparing vibration level readings taken by
different types of instruments and transducers can be very confusing and can lead to
mistrust of the systems involved.
Knowledge of how to properly compare readings is
required before comparing any readings is attempted.
This application note explains the variables involved in some detail and will act as a
guideline as you compare vibration readings.
Transducer Type
Three (3) basic types of vibration transducers are available which correlate with the
three (3) types of measured physical motion, Acceleration, Velocity and Displacement.
Accelerometer
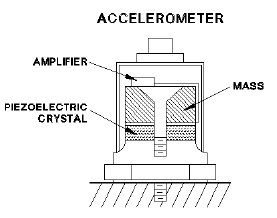
Accelerometers are a piezo-electronic (crystal) device. A pre- loaded crystal is charged
with current and as the crystal is compressed or de-compressed by vibration an output
proportional to g's (gravity) is provided. A "g" is equal to 9.80 meters/second2
or one (1) standard earth gravity.

Accelerometers are normally used for high-frequency bearing cap vibration readings
(Case/Bearing Cap Absolute on machines using rolling element bearings. Usually the output
is integrated electronically to velocity (in/sec or mm/sec). Other applications include
monitoring Gears and High Frequency Applications.
Velocity Pick-up
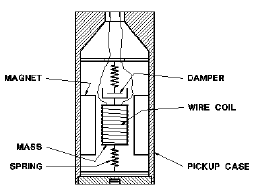
Two (2) types of Velocity Sensors exist, mechanical and electronic. Mechanical types are
the most common and are made up of a spring mounted coil mounted inside a magnet.
Vibration causes the coil to move in relation to the magnet which produces a voltage
output directly proportional to Velocity. Electronic Velocity Sensors are Accelerometers
with an electronic integrator built in to the unit. Output of a Velocity Sensor can be
expressed in many different terms, inches/second (in/sec) or millimeters/second (mm/sec)
being the standards.

Velocity Transducers are normally used for Bearing Cap Vibration Monitoring (Case/Bearing
Cap Absolute) on machines with rolling element bearings. They have the advantage of high
outputs and the signal is read directly in velocity (in/sec or mm/sec).
Eddy Probes (Proximity)
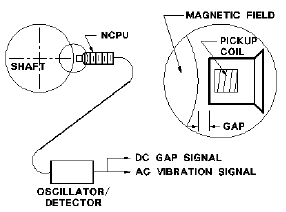
Eddy or Proximity Probes are a displacement device that measure the relative motion
between the probe mounting location and the target (shaft). Output is directly
proportional to displacement and is usually measured in mils (.001") or millimeters
(mm).

Eddy Probes are used on machines with Journal (Sleeve) type bearings. Where the
measurement of motion between the Bearing and Shaft is critical.
Bearing Type
Two primary types of bearings are in use today, Rolling Element Bearings and Journal or
Sleeve Bearings.

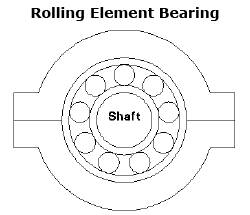
Rolling Element Bearings are zero (0) clearance devices. All vibration of the shaft is
transmitted directly to the bearing cap.

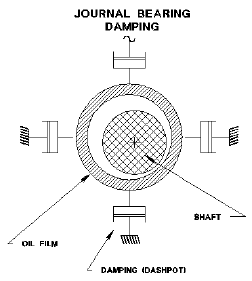
Journal or Sleeve Bearings are designed so that the oil film provides damping. The shaft
is free to vibrate within the bearing. Due to the damping provided by the oil film very
little of the shaft vibration is transmitted to the bearing cap. The oil film damping
provides even higher levels of attenuation to higher frequencies.
Measurement Type
Only measurements of the same type can be compared. Bearing Cap or Case Vibration cannot
be directly compared to Shaft Relative or Shaft Absolute and visa versa.
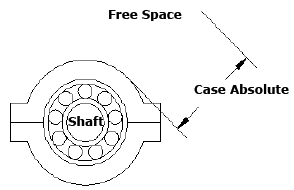
Case Absolute
Case or Bearing Cap Absolute is the measurement of the Case or Bearings Caps (Location of
Transducer) motion relative to free space (or absolute motion). Case or Cap Absolute is
usually used for monitoring Rolling Element Bearings.

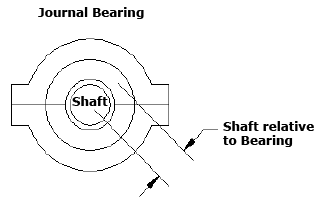
Shaft Relative
Shaft Relative is the measurement of motion between the Shaft and whatever the measuring
devise is mounted to. This measurement is normally taken with a NCPU or Proximity Sensor.
Shaft Relative measurements are used for Journal or Sleeve Bearing Applications.

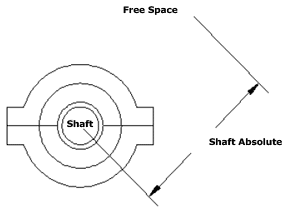
Shaft Absolute
Shaft Absolute is the measurement of the shaft's motion relative to free space (or
absolute). Shaft Absolute can be measured two (2) ways, the first being electronically
summing the signals of both a Eddy Probe measuring shaft relative and a accelerometer measuring case absolute,
the second being using a shaft rider which is a spring mounted device that physically
rides on the surface of the shaft, normally a velocity sensor integrated to displacement
is mounted on top of the shaft rider. Shaft Absolute is normally used where the rotating
assembly is five (5) or more times heavier than the case of the machine.

Engineering
Units
0 to Peak (0-P)
Both Velocity (in.sec, mm/sec) and Acceleration (g's) by definition are measured in 0 to
Peak or one/half the Peak to Peak signal as viewed on an oscilloscope.
Peak to Peak (P-P)
Displacement by definition is measured in Peak to Peak or the actual Peak to Peak Motion
of the Shaft.
Root Mean Square (RMS)
Root Mean Square (RMS) is a popular method of measuring Case or Bearing Cap Vibration as
many vibration engineers have found that RMS is more indicative of actual rolling element
bearing condition. Although rarely found in vibration wave-forms a pure sine wave RMS
would be .707 times the 0 to Peak Value.
Transducer Considerations
Frequency Response
The frequency response of a vibration transducer is very important when comparing
readings. Transducers with a wider or broader frequency response will typically see more
vibration if it is present than a narrower bandwidth transducer. How different vibration
frequencies contribute to overall values is dependent on their phase relationship to each
other, some may add, some may subtract from the overall value.
| Eddy Probes |
Displacement |
200 mv/mil |
| Velocity (Mechanical) |
Velocity |
500 mv/in/sec |
| Velocity (Piezoelectric) |
Velocity |
500-1000 mv/in/sec |
| Accelerometer |
Acceleration |
100 mv/g |
Mounting
How a transducer is mounted is also critical to comparing measurements. Accelerometers are
extremely sensitive to the method of attachment. Differences in bandwidth can be measured
between hand-held, magnet attached, epoxy, and stud mounted installations.
Installation instructions must be followed precisely to obtain the manufactures
transducer specifications. Accelerometers not mounted perfectly perpendicular to the
surface or on a flat surface will produce stress risers which will also produce false
signals.
Measurement Location
When comparing readings it is essential that all readings are taken at the same location
and the same plane. Even small differences in location can effect the overall readings.
All vibration transducers are single plane devices and only measure in the plane in which
they are held or are mounted.
Instrument Considerations
All Instruments handle signal is different ways. Different instruments have their own
frequency response and filtering. Knowledge must be gained on the instruments used before
the outputs can be compared even when they use the same transducer.
Conversion Formulas
Displacement, Velocity and Acceleration are mathematically related to each other as a
function of frequency. Electronic integrators or differentiation are also used to change
one term to the other. Once again it must be understood that the readings be of the same
type or they will not agree.
D = Displacement, P-P, Mils.
V = Velocity, 0-P, in/sec.
A = Acceleration, 0-P, g's.
D = 19.10 x 10³ x (V/CPM)
D = 70.4 x 10⁶ x (A/CPM2)
V = 52.36 x 10⁻⁶ x D x CPM
V = 3.87 x 10³ x (A/CPM)
A = 14.2 x 10⁻⁹ x D x CPM2
A = 0.27 x 10⁻³ x V x CPM
Summary
In General it is difficult to get any two readings to precisely agree with one another.
Even when care is taken to insure that transducers and locations are the same and that the
measurement type is the same, agreement within ±30% depending on the instrument is
considered good.
Even though overall values will not agree precisely spectrum Data or frequencies will
be comparable within the limits of the bandwidth of the different instruments.
Checklist
- Is Transducer Type the same
- Bearing Type
- Is Measurement Type the Same
- Engineering Units the same
- Frequency Response of Transducer
- Mounted Transducer Frequency Response
- Where Readings Taken at the same location
- Where Readings Taken in the same Plane
- Instrument Frequency Response
|

