Thrust Position Monitoring was one of the
earliest applications for Eddy Current Transducers. When utilized for this application, it
is one of the most important components of a complete machinery protection system.
Thrust
bearing failure produces one of the most catastrophic failures of a rotating machine. This
could result in very expensive repairs and the possibility of machine replacement.
Theory of Operation
 Eddy Probe Transducers work on the proximity theory of operation. A System consists of a matched component system: a
Probe, an Extension Cable and an Oscillator /Demodulator. A high frequency RF signal @2
mHZ is generated by the Oscillator/Demodulator, sent through the extension cable and
radiated from the Probe tip. Eddy currents are generated in the surface of the shaft. The
Oscillator /Demodulator demodulates the signal and provides a modulated DC Voltage where
the DC portion is directly proportional to gap (distance) and the AC portion is directly
proportional to vibration. In this way a Eddy Current Transducer can be used for both
Radial Vibration and distance measurements such as Thrust Position and Shaft Position. Eddy Probe Transducers work on the proximity theory of operation. A System consists of a matched component system: a
Probe, an Extension Cable and an Oscillator /Demodulator. A high frequency RF signal @2
mHZ is generated by the Oscillator/Demodulator, sent through the extension cable and
radiated from the Probe tip. Eddy currents are generated in the surface of the shaft. The
Oscillator /Demodulator demodulates the signal and provides a modulated DC Voltage where
the DC portion is directly proportional to gap (distance) and the AC portion is directly
proportional to vibration. In this way a Eddy Current Transducer can be used for both
Radial Vibration and distance measurements such as Thrust Position and Shaft Position.
Special Considerations
Single or Dual Voting
When determining the number of transducers for monitoring thrust position on a machine,
several factors should be considered. First, will the system be required to trip the
machine if thrust failure is detected, or secondly what other means are available to
verify thrust failure.
One of the rotating machinery instrumentation standards, API- 670 (American Petroleum
Institute), specifies Dual Voting Thrust Position at each thrust bearing. This approach to
thrust position measurement requires that two transducers be mounted at each thrust
bearing. Their respective output signals are then compared to alarm and shutdown limits.
Both output signals must exceed the shutdown limit before the machine is tripped. This
method of thrust measurement increases the system's reliability, and is recommended for
shutdown operation.
A single Eddy Current transducer for thrust position measurement should only be used
when the monitoring system is not required to shutdown the machine, and other means are
available to verify thrust failure.
Circuit OK and Fault Detection Circuits are not used when monitoring thrust position,
as they could effect the proper monitoring of this parameter. The reason for this is that
a rapid thrust failure could cause Fault Detection Circuits to operate inhibiting a valid
shutdown alarm.
Linear Range
Several versions of Eddy Current Transducers are available with a variety of Linear Ranges
and body styles. In most cases, SKF-CM's Model CMSS65 and 68 with a linear range of 90
mils (0.090") is more than adequate for thrust position measurements. Other Eddy
Current transducer systems are available with ranges of 250, 500 and 1000 mils.
The range required for each thrust application can be calculated per the following
example:
| Active Direction Allowable Wear |
30 mils |
| Float Zone |
10 mils |
| Inactive Direction Allowable Wear |
30 mils |
| |
--------- |
| Total Range Required |
70 mils |
Transducer Location
Transducer location is very important for a proper Thrust Position monitoring system. The
objective of the system is to measure actual thrust position. Thusly, care needs to be
taken that the system is not observing items such as thermal growth of the shaft.
STI recommends that the Eddy Current Transducers used to monitor thrust position be
located within two (2) shaft diameters of the thrust bearing. This assures that the eddy
Current system is not adversely affected by shaft thermal growth. In some cases this is
not possible, and the engineer needs to be aware of the thermal growth expected and plan
accordingly.
STI also recommends that the Eddy Current Transducer(s) observe an integral part of the
shaft, as it possible for a non-integral part to loosen creating a false reading. As an
example, sweated on Thrust Collars have been known to come loose, causing normal thrust
readings while the machine is experiencing a catastrophic failure.
External Mounting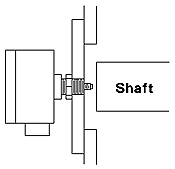
External mounting is the preferable method of mounting, and can be completed when the end
of the shaft is accessible through a cover plate or end plate. Care must
be taken to insure that the thrust bearing is on the same end of the machine so that the
measurement will not be affected by thermal growth of the shaft. The SKF-CM Model CMSS912
Dual Axial Probe Mounting Adapter with NPT is available for this application.
Advantages of External Mounting:
- Eddy Current Probe replacement while machine is running.
- Usually good viewing surface
- Gap may be changed while machine is running.
Disadvantages of External Mounting:
- May not be close to thrust bearing.
Internal Mounting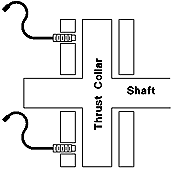
Internal mounting is accomplished by installing the Eddy Current Transducer either
directly through the thrust bearing or with a custom designed bracket viewing the thrust collar directly or a nearby shoulder on the shaft. Care must
be taken in locating and tying down the transducer cable(s) to prevent damage. If an
existing exit hole from the case does not exist, one will need to be drilled and tapped
above the oil line.
Advantages of Internal Mounting:
- Usually good viewing surface
- Close to thrust bearing
Disadvantages of Internal Mounting:
- No access to transducer while machine is running.
- Cables must be tied down due to "windage".
- Transducer cable exits must be provided.
- Care must be taken to avoid oil leakage.
Measurement Conventions
There are several important measurement conventions that must be decided upon prior to
installation and calibration of the system. It is suggested that the conventions used be
common throughout a plant to avoid confusion.
Thrust Position Signal Conditioning Cards and Display Scales are available in many
different ranges to satisfy most applications, specials are available on request. The most
common thrust position full scale range is +40-0-(-)40 mils which is smaller than the
maximum range of 90 mils for the SKF-CM's Model CMSS65 and 68.
SKF-CM Thrust Position Signal Sensor Cards have a jumper so that upscale and down-scale
may be changed to reflect actual movement of the shaft. Care needs to be taken to document
active (normal) thrust direction of the shaft, and the actual measurement direction of the
Eddy Probe Installation.
Zero (0) Active Shoe
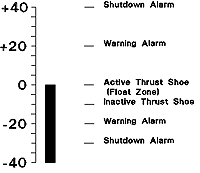 When using the "Zero Active Shoe" method of gapping the Eddy Current Transducer,
the shaft is mechanically barred in the active or normal direction through
the float zone until it is against the active thrust shoe. The Eddy Probe and Monitoring
System are then calibrated to Zero (0). This method of calibration provides more system
range in the active direction, and when the machine is operating normally with no wear of
the thrust bearing the monitoring system will read "0". When using the "Zero Active Shoe" method of gapping the Eddy Current Transducer,
the shaft is mechanically barred in the active or normal direction through
the float zone until it is against the active thrust shoe. The Eddy Probe and Monitoring
System are then calibrated to Zero (0). This method of calibration provides more system
range in the active direction, and when the machine is operating normally with no wear of
the thrust bearing the monitoring system will read "0".
Zero (0) Center of Float Zone
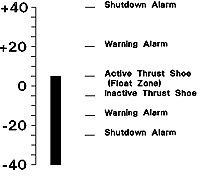 When using the "Center of Float Zone" method, the shaft is
mechanically barred to accurately measure the total float zone with the Eddy Probe or a
dial indicator. The Eddy Current Transducer and monitoring system are then gapped and
calibrated to read zero (0) when the thrust collar is in the center of the float zone.
This method provides equal range in both active and inactive directions, and when the
machine is running normally with no wear the monitoring system will display one half the
float value (ie: +5 mils). When using the "Center of Float Zone" method, the shaft is
mechanically barred to accurately measure the total float zone with the Eddy Probe or a
dial indicator. The Eddy Current Transducer and monitoring system are then gapped and
calibrated to read zero (0) when the thrust collar is in the center of the float zone.
This method provides equal range in both active and inactive directions, and when the
machine is running normally with no wear the monitoring system will display one half the
float value (ie: +5 mils).
Plus (+) Active (Normal) Direction
All thrust position monitoring systems are installed and calibrated so that wear on the
active thrust bearing or normal direction produces a plus (+) or up scale reading. Minus
(-) or down scale readings indicate motion towards the inactive thrust bearing.
Target Material/Target Area
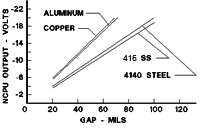 Target Material Target Material
Eddy Current Transducers are calibrated at the factory for 4140 Steel unless specified otherwise. As Eddy Probe's are sensitive to the permeability and
resistivity of the shaft material, any shaft material other than 4000 series steels must
be specified at the time of order. In cases of exotic shaft material, a sample may need to
be supplied to the factory.
Mechanical Runout
Eddy Probe Transducers are sensitive to the shaft or target smoothness. For thrust
position, a perfectly smooth finish is not required as the system will average the DC
signal. An area approximately 3 times the diameter of the Eddy Probe must be provided for
a viewing area.
Transducer (Probe) side clearances
The RF Field emitted from the Probe tip of a Eddy Probe is approximately a 450 coned
shape. Clearance must be provided on all sides of the Probe tip to prevent interference
with the RF Field. As an example, if a bearing is drilled to permit installation, the hole
must be counter bored to prevent side clearance interference. Care must also be taken to
avoid collars or shoulders on the shaft that may thermally "grow" under the
Probe tip as the shaft grows from heat.
Eddy Probe tip to tip clearances
Although Eddy Probe tip to tip clearances are not normally an issue on most machines, it
should be noted that Eddy Probe's radiate an RF Field larger than the Probe tip itself. As
an example, Model CMSS65 and 68 should never be installed with less than one (1) inch of
Probe tip to tip clearance. Larger Probe's require more clearance. Failure to follow this
rule will allow the Oscillator/Demodulator to create a "beat" frequency which
will be the sum and difference of the two Oscillator/Demodulator RF frequencies.
System Cable Length and Junction Boxes
Eddy Probe Transducer Systems are a "tuned" length, and several system lengths
are available. Length is measured from the Eddy Probe tip to the Oscillator/Demodulator,
and is measured electrically which can slightly vary the physical length. For example, the
CMSS65 and 68 are available in 5, and 10 meter system lengths. Care must be taken to
insure that the proper system length is ordered to reach the required Junction Box.
Grounding and Noise
Electrical noise is a very serious consideration when installing any vibration transducer,
and special care needs to be taken to prevent unnecessary amounts of noise. As most plant
electrical noise is 60 HZ, and many machines running speed is also 60 HZ, it is difficult
to separate noise from actual vibration signal. Therefore, noise must be kept to an
absolute minimum.
Instrument Wire
A 3-wire twisted shielded instrument wire (ie; Belden #8770) is used to connect each
Oscillator/Demodulator to the Signal Conditioner in the Monitor. Where possible, a single
run of wire from the Oscillator/Demodulator (Junction Box) to the Monitor location should
be used. Splices should be avoided.
The gauge of the selected wire depends on the length of the instrument wire run, and
should be as follows to prevent loss of high frequency signal:
Up to 200 feet 22 AWG
Up to 1000 feet 20 AWG
Up to 4000 feet 18 AWG
The following wiring connection convention should be followed:
- Red -24 VDC
- Black Common
- White Signal
Common Point Grounding
To prevent Ground Loops from creating system noise, system common, ground and instrument
wire shield must be connected to ground at one location only. In most cases, the
recommendation is to connect commons, grounds and shields at the Monitor location. This
means that all commons, grounds and shields must be floated or not connected at the
machine.
Occasionally due to installation methods instrument wire shields are connected to
ground at the machine case and not at the monitor. In this case, all of the instrument
wire shields must be floated or not connected at the monitor.
Conduit
Dedicated conduit should be provided in all installations for both mechanical and noise
protection. Flexible metal conduit should be used from the Eddy Probe to the Oscillator
/Demodulator junction box, and rigid bonded metal conduit from the junction box to the
monitor.
Calibration
All Eddy Current Systems (Probe, Cable and Oscillator Demodulator) should be calibrated
prior to being installed. This can be done by using a SKF-CM CMSS601 Static Calibrator,
-24 VDC Power Supply and a Digital Volt Meter. The Eddy Probe is installed in the tester
with the target set against the Probe tip. The micrometer with target attached is then
rotated away from the probe in 0.005" or 5 mil increments. The voltage reading is
recorded and graphed at each increment. The SKF-CM Model CMSS65 and 68 systems will
produce a voltage change of 1.0 VDC +-.05 VDC for each 5 mils of gap change while the
target is within the Probe's linear range.
Gap
Extreme care must be taken to insure that the thrust position Eddy Probes are gapped
properly. Failure to gap the transducer properly will result in the allowed mechanical
thrust range being outside the transducer's linear range.
Prior to gapping the Eddy Probe, the allowable wear, float zone and associated alarm
levels should be over-laid onto the Probes calibration work-sheet. This will insure that
all alarms are within the linear range of the Eddy transducer and provide the optimum
installed gap.
It will be necessary to mechanically bar the shaft to a known position, usually against
the active thrust shoe (see Measurement Conventions). The Eddy Probe can then be gapped
and the DC voltage documented.
Installation Checklist
- Mounting Type, Internal External
- Number of Transducers, Single or Dual
- Linear Range
- Close to Thrust Bearing (Thermal growth)
- Target Integral to Shaft
- Target Material, 4140 Other
- Smooth Target Area
- Size of Target Area
- Active Thrust Direction
- Eddy Probe Installation Documented
- Junction Box Location(s)
- Metal Conduit (Junction Box to Monitor)
- Flexible Conduit (Junction Box to Eddy Probe)
- Correct Instrument Wire
- Shielding Convention, Monitor or Machine
- Calibration
- Gap Set and Documented
|